Plate Production
Plate Production Lesson for members of the Vectric Master Training Course:

Vectric Documentation:
Plate Production
This command is for designing and engraving multiple badges or nameplates using variables for positioning imported data from a text file list. The production plate functionality is typically used by engravers making badges from a database file supplied by a customer, but could also be useful for making nameplates for hotel rooms with consecutive numbering.
Procedure
Draw and Setup the Master Template
Create a New job and specify the Material Size to equal the Sheet size the badges will be cut from.
Layout the badge / plate at the required size and using the Text Tools add variables where imported data / text is required. Variables are defined using double exclamation marks ('!!') at the start and end of the variable name.

Calculate Toolpaths
Select and calculate the toolpaths for each of the elements on the design. For example, calculate an engraving toolpath for the text and logos and a separate Profile cut-out toolpath around the outer edge to cut out the design
Use the Plate Production Tool on the master template
With all of the vectors that make up the master template selected, click on the Plate production tool to open the Plate Production Dialog window.
The Plate Production Dialog
The left side of the Plate Production form is used to layout the plates / badges on the selected sheet of material, and shows the total number of plates that can be engraved / machined from each sheet of material.
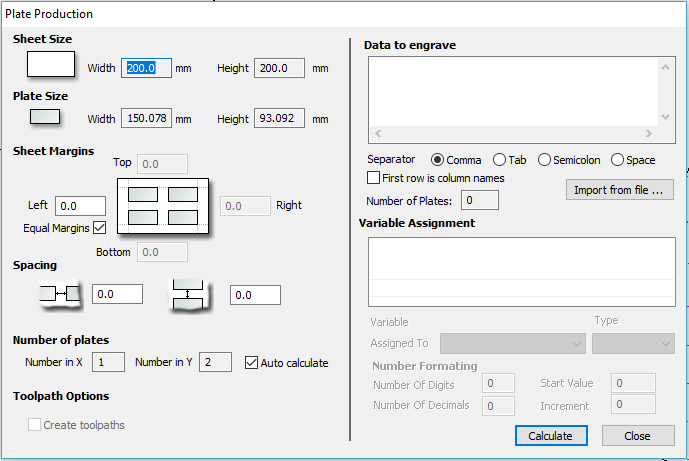
Material Size
This is the material sheet size that the badges will be engraved onto. If the number and size of the badges requires additional sheets of material to be used the software automatically creates a separate layer for each sheet required.
Plate Size
This is the size of the selected Plate / Badge and is based on the bounding box of the selected vectors.
Sheet Margins
This specifies the border margin between the edge of the material sheet and the plates.
Independent margin spacing can be set for the Top, Bottom, Left and Right sides of the material
Equal Margins ensures the same space is added around all 4 sides of the plates.
Spacing
This is the horizontal and vertical spacing between each Plate / Badge.
Number of Plates
The number of plates that will fit on to the specified material sheet size is automatically calculated. This calculation takes the plate size and adds the Sheet Margins and Plate Spacing to determine the maximum number of plates that can be made from each sheet.
Toolpath Options
If toolpaths have been calculated for the master Template this option is available.
Checking ✓ this option automatically calculates toolpaths for all the plates / badges in the project.
Unchecking this option only creates the vectors for each plate / badge.
Import the Data to be Merged into the Template
The right-hand side of the Plate Production form is used to select the data that will be merged into the template, and how the data will be interpreted to create each plate / badge
Import the required text / data file using Import from file and select the appropriate format separator.
The data file is commonly created using a spread sheet such as Windows Excel. Use the option to Save As or Export to obtain the required file format that includes the correct Separator information.
Separator
The separator is the method used in the data file for dividing each set of information into columns. The most commonly used options are: Comma, Tab, Semicolon or a Space
First row is column names
It's very common for the first row of data in a file to simply show what each of the field names are, and this information is not used on the badge or plate. Checking the box First row is column names tells the software to start working with data from row 2
Assign the Variables to the data in the text file
All of the variables specified on the template - text with double exclamation marks '!!' on either side '!!' are automatically listed on the form. These variable names are each assigned to a data field (column of text) inside the data file.
Variable Assignment
Click to select a Variable Name then select the data field from the imported file that is required on each badge / plate i.e. the person's name
Repeat for each of the Variable Names listed on the form
Number Formatting
Variables can be assigned to Text from a data file - Names, Dept., etc. or to a Counter number that can be formatted and incremented using the Number Format options.
Calculate
Click Calculate to create all Badges and associated Toolpaths
If toolpaths have previously been calculated for the vectors in the Master Template, the option to automatically Create Toolpaths for each badge / plate is switched on in the bottom left corner of the form.
Close
Click Close to finish plate production and close the form
Multiple Sheets
Multiple Layers are automatically created if multiple sheets of material are required to engrave all of the badge data from the imported text file. Layer named Sheet 1 is displayed in the 2D view showing the badges on this sheet.
Each of the Sheets is on a different layer and can be set visible or invisible using the Layer Manager.
Multiple Toolpaths
When Toolpaths are automatically calculated, a separate toolpath for each operation on each sheet of material is calculated and named using the convention 'S1 - Name', where the Name is the name of the toolpath previously calculated for the template.