Add Draft to Model
Add Draft to Model Lesson for members of the Vectric Master Training Course:

Vectric Documentation:
Add Draft to Model
For some applications it can be useful to eliminate vertical walls on 3D models, especially if the machined part is intended to be used as the basis for a mold or vacuum forming tool.
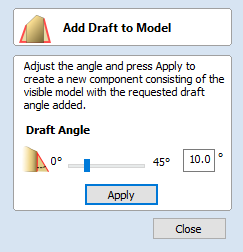
The Add Draft tool will automatically add a minimum angle to any steep walls that exist in your model. The draft angle is specified by using the slider or entering a typed value in the form.
When the Apply button is pressed, the tool creates a new 3D Component by baking the visible Components and applying the draft angle across all the walls of the composite model. Note that you do not select the Component/s to apply the draft angle to, just ensure that they are visible in the 3D view. The resulting Component will not have any wall angles that are steeper than the specified draft angle. Once complete, both the original Component/s and the new Component will be visible, although the original may be obscured by the new Component. The Component with the draft angle will be named appropriately indicating the amount of draft that was added. The images below show how a Component looks before and after adding 20° of draft.


Note
If you are creating a model within a two sided environment the draft will only be applied to the side you are currently working on. To apply a draft to both sides you will need to switch over to the opposite side and apply a draft to the model there.
Click here for more live lesson replays on Add Draft to Model