Draw Rectangle
Rectangles Lesson for members of the Vectric Master Training Course:

Vectric Documentation:
Draw Rectangle
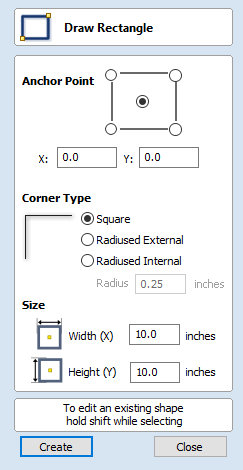
Rectangles can be created by using the Draw Polyline tool or using the Draw Rectangle Tool. The latter tool allows rectangles to be created interactively with the cursor and Quick Keys or by entering the exact coordinates, type of corners (square, internal or external radius) and Width and Height using typed input.
Interactive Creation
The quickest and simplest way to draw a rectangle is:
- Click and drag the left mouse button in the 2D View to begin drawing the rectangle from its first corner.
- While holding the left mouse button, drag to the required size.
- Releasing the left mouse button.
Note
Holding Alt and dragging creates a rectangle from the center. Holding Ctrl creates a square.
Quick Keys
Instead of releasing the left mouse button when you have dragged your shape to the required size, you can also type exact values during the dragging process and set properties precisely.
- Left-click and drag out your shape in the 2D View.
- With the left mouse button still pressed, enter a quick key sequence detailed below.
- Release the left mouse button.
Default
By default, two values separated by a comma, will be used to set width and height of your rectangle. One value will create a square with that side length. While you are dragging out the rectangle corner, type Width Value , Height Value Enter or Side Length , Enter to create a rectangle with the specified width and height.
Example
- 1 , 2 . 5 Enter - Creates a rectangle of width 1 and height 2.5
Specifying Further Properties
By using specific letter keys after your value, you can also indicate precisely which property it relates to.
- Value X - Creates a rectangle at the dragged height but with the width set to the entered value
- Value Y - Creates a rectangle at the dragged width but with the height set to the entered value
- Value R Value X - Create a rectangle with radius R and width X
- Value R Value Y - Create a rectangle with radius R and height Y
- Value W Value H - Create a rectangle with width W and height H
- Value R Value W Value H - Create a rectangle with width W and height H
Examples
- 1 X - Current dragged height with a width of 1
- 1 Y - Current dragged width with a height of 1
- 0 . 1 R 1 X - A corner radius of 0.1, a width of 1 and current dragged height
- 0 . 1 R 1 Y - A corner radius of 0.1, a width of 1 and current dragged height
Note
These key combinations must be pressed whilst dragging with the mouse to create the rectangle.
Exact Size
Rectangles can also be drawn by entering the required XY origin point with the Width and Height of the rectangle.
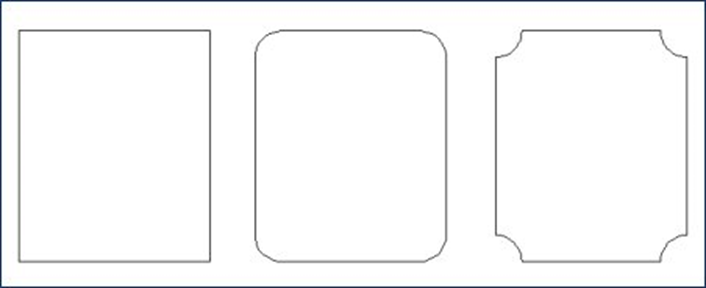
Corner Type
Corners of the rectangle can be Square, Radiused Externally or Radiused Internally.
Interactive Corner Radii
If you choose to have radiused corners then 4 additional green handles will appear on the previewed rectangle. These handles can be interactively dragged to modify the radii of the corners.
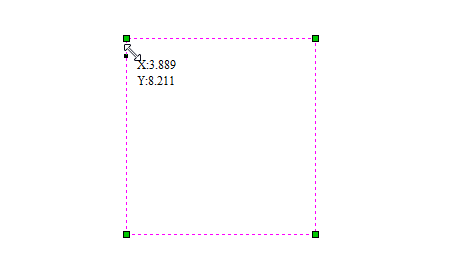
Editing Existing Rectangles
To edit an existing rectangle:
- Select the rectangle to modify and open the Draw Rectangle form.
- The selected shape is displayed as a dotted magenta line.
- Edit the Width and Height values.
- Click Apply to update the rectangle.
To modify another rectangle without closing the form hold a Shift key down and select the next rectangle.